10 Easy Ways to Resolve DHCP Lookup Failed on Chromebook and Windows
Introduction
DHCP Lookup Failed: To understand the error and what it means
DHCP lookup failed error is a common issue faced by users of both Chromebook and Windows devices. Simply put, this error occurs when the device cannot obtain an IP address from a DHCP server, resulting in a failed connection to the network.
Correcting the DHCP lookup failed error is important because it directly affects the device’s ability to connect to the Internet and perform online operations. Without a valid IP address, the device remains disconnected from the network, limiting its functionality and usefulness.
Stay tuned for upcoming parts where we will delve into the reasons behind DHCP lookup failed error and provide effective solutions to help you fix this issue. Don’t let this error ruin your online experience again – let’s get in and get your device back online!
-
Unable to understand DHCP Search
- Definition and cause of DHCP Lookup Failed Error
DHCP lookup failed error is a problem that occurs when a device fails to successfully obtain an IP address from a DHCP (Dynamic Host Configuration Protocol) server The DHCP server is responsible for assigning unique IP addresses to devices on the network in order to they can communicate and go online.
Different things can happen after DHCP lookup failed error:
- Network connectivity problems: If there are problems with network cables, Wi-Fi signal strength, or other physical connections, the device may not be able to connect to a DHCP server and obtain an IP address
- Router configuration issues: Incorrect router configuration or incorrect DHCP server configuration can also cause a DHCP lookup failed error. This can happen if the DHCP service is not enabled on the router or if its IP address range is not properly configured.
- Software Conflict: Some software or applications running on the device may interfere with the DHCP tracing process. For example, a firewall or VPN setting may prevent the device from communicating with a DHCP server.
- Outdated or incompatible network driver: If the device’s network driver is outdated or incompatible with the operating system, it may cause a DHCP lookup failed error In such cases, the device may not connect to the DHCP server do not communicate well.
- Impact on Chromebooks and Windows devices
The DHCP lookup failed error can significantly impact Chromebook and Windows users. Without a valid IP address, the device cannot connect to the local network or connect to the Internet. This can interfere with online functions such as browsing web pages, downloading files, streaming content, or using web-based applications.
Failure of DHCP searches on Chromebook devices can result in loss of connectivity to Google services and malfunctioning of web applications. It can also prevent Chromebooks from receiving updates and security patches, potentially making them vulnerable to security threats.
For Windows machines, the DHCP lookup failed error has the same effect. Users may lose Internet connectivity altogether or be unable to access many network resources. This can affect productivity, communication, and the ability to perform daily tasks based on internet connections.
Understanding the causes and consequences of a DHCP lookup failed error is important for effective troubleshooting and troubleshooting. In the following sections, we will explore practical solutions that can help you overcome this error and restore network connectivity to your device.
III. 10 Easy Ways to Fix DHCP Lookup Failed
If you receive a DHCP lookup failed error, there are several simple troubleshooting steps you can take to fix the problem and restore network connectivity to your device Follow these steps to correct the problem successfully.
- Restart your device and router
- Follow these steps to restart your device.
○ Close all programs and save your work.
○ Click the Start button, and then select Restart.
○ Restart your device and wait for it to reconnect to the network.
- Follow these steps to restart your router.
○ Find the power adapter that comes with your router.
○ Unplug the power adapter from the power outlet.
○ Wait about 10 seconds.
○ Plug the power adapter back into the power outlet.
○ Wait for your router to restart and connect to your device.
Restarting your device and router can often fix common network issues by deleting temporary settings or re-establishing network connectivity.
- Check network cables and connections
- Ensure that all physical connections are secure and properly connected:
○ Make sure the Ethernet cable is properly connected to your device and router.
○ When using a Wi-Fi connection, make sure the wireless network adapter is enabled and connected to the correct network.
- Troubleshooting steps for wired communications:
○ Try using a new Ethernet cable to troubleshoot cable problems.
○ Connect your device directly to the router with an Ethernet cable, bypassing any network devices on the network.
Checking network cables and connections is important because slow or faulty connections can prevent your device from communicating with a DHCP server.
- Reset network settings
- Step-by-step guide on resetting network settings:
○ On your device, go to the Network settings or Control Panel.
○ Find the option to reset network settings or restore defaults.
○ Click on the option and confirm the reset.
○ Restart your device and allow it to reconnect to the network.
- Potential impact on other network configurations:
○ Resetting network settings may revert customized network configurations to their default state.
○ You may need to reconfigure any specific network settings or preferences after the reset.
Resetting network settings can help resolve DHCP lookup failed errors caused by misconfigurations or conflicting network settings.
- Update network drivers
- Explanation of outdated or incompatible drivers:
○ Outdated or incompatible network drivers can cause DHCP lookup failures by preventing your device from properly communicating with the network.
○ It is important to keep your network drivers up to date to ensure smooth network connectivity.
- Instructions on updating network drivers:
○ Identify the manufacturer and model of your network adapter. You can usually find this information in the Device Manager or System Information.
○ Visit the manufacturer’s website and navigate to the support/downloads section.
○ Locate the latest driver for your network adapter model and download it.
○ Follow the manufacturer’s instructions to install the updated driver.
Updating your network drivers can help resolve DHCP lookup failed errors caused by outdated or incompatible drivers.
- Disable VPN and firewall temporarily
- How VPN and firewall can interfere with DHCP lookup:
○ VPN (Virtual Private Network) and firewall software can sometimes disrupt DHCP lookup, preventing your device from obtaining an IP address.
○ These security measures may block or alter network traffic, leading to connectivity issues.
-
Steps to temporarily disable them for troubleshooting:
○ Locate the VPN software or firewall program running on your device.
○ Open the software settings or preferences.
○ Look for an option to temporarily disable or turn off the VPN or firewall.
○ Disable or turn off the VPN or firewall.
○ Restart your device and attempt to connect to the network again.
By temporarily disabling VPN and firewall software, you can determine if they are the cause of the DHCP lookup failed error.
- Flush DNS cache
- Definition of DNS cache and its impact on DHCP lookup:
○ DNS (Domain Name System) cache is a temporary storage on your device that stores information about recently visited websites.
○ Over time, the DNS cache can become outdated or corrupted, causing issues with DNS resolution and DHCP lookup.
-
Instructions on flushing DNS cache on Chromebook and Windows:
○ For Chromebook:
■ Open the Chrome browser.
■ In the address bar, type “chrome://net-internals/#dns” and press Enter.
■ Click on “Clear host cache” and confirm the action.
■ Restart your Chromebook.
○ For Windows:
■ Press the Windows key + R to open the Run dialog box.
■ Type “cmd” and press Enter to open the Command Prompt.
■ In the Command Prompt, type “ipconfig /flushdns” and press Enter.
■ Wait for the command to execute, then restart your Windows device.
Flushing the DNS cache can help resolve DHCP lookup failed errors by clearing any outdated or corrupted DNS information stored on your device.
- Release and renew IP address
- Importance of releasing and renewing IP address:
○ Releasing and renewing your IP address can help resolve DHCP lookup failed errors by refreshing your network connection.
○ This process allows your device to request a new IP address from the DHCP server, which can resolve any conflicts or errors.
- Steps to release and renew IP address in Chromebook and Windows:
○ For Chromebook:
- Click on the network icon in the system tray.
- Select “Network settings.”
- Scroll down and click on “Network” under “Advanced.”
- Click on your network connection.
- Click on the “Disconnect” button.
- Wait a few seconds, then click on the “Connect” button.
○ For Windows:
- Press the Windows key + R to open the Run dialog box.
- Type “cmd” and press Enter to open the Command Prompt.
- In the Command Prompt, type “ipconfig /release” and press Enter.
- Wait for the command to execute, then type “ipconfig /renew” and press Enter.
- Wait for the command to execute, then close the Command Prompt.
Releasing and renewing your IP address can be an effective solution to DHCP lookup failed errors, as it resolves any potential conflicts in the network configuration.
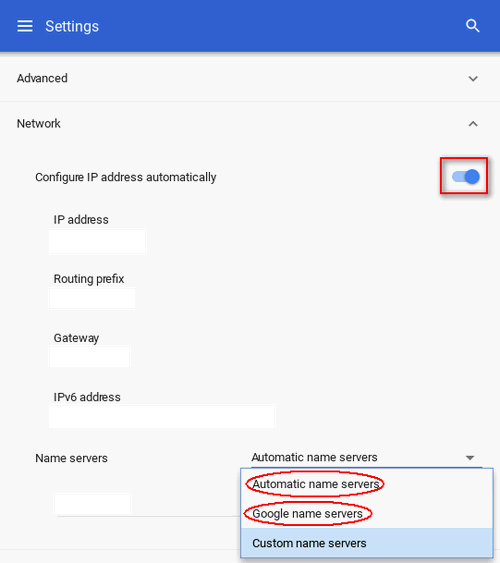
- Change the DNS server configuration
- Description of DNS server configuration and effects:
○ DNS server settings determine how your device translates domain names into IP addresses.
○ Incorrect or problematic DNS server configuration can cause a DHCP lookup failed error.
- Instructions for changing DNS server settings:
○ For Chromebooks:
- Click the network icon on the system tray.
- Select “Network settings”.
- Scroll down and click “Network” under “Advanced”.
- Click on your network connection.
- Scroll down and click on “DNS”.
- Select “Automatic” to use the default DNS settings provided by your network, or “Custom” to manually enter a new DNS server address.
○ For Windows:
- Press the Windows key + R to open the Run dialog box.
- Type “control panel” and press Enter to open the Control Panel.
- Click “Network and Internet” and then click “Network and Sharing Center”.
- Click on your network connection.
- Click “Properties” and select “Internet Protocol Version 4 (TCP/IPv4)”.
- Click “Properties” again.
- Select “Get DNS server address automatically” to use the default DNS settings provided by your network, or select “Use the following DNS server address” to manually enter a new DNS server address
Changing the DNS server settings can fix the DHCP lookup failed error which allows your device to successfully connect to DNS servers and resolve domain names.
-
Disable IPv6
-
Overview of IPv6 and its potential conflicts:
○ IPv6 is the latest version of the Internet Protocol that identifies devices on a network.
○ Sometimes, IPv6 can cause conflicts and lead to DHCP lookup failed errors.
-
Steps to disable IPv6 on Chromebook and Windows:
○ For Chromebook:
- Click on the network icon in the system tray.
- Select “Network settings.”
- Scroll down and click on “Network” under “Advanced.”
- Click on your network connection.
- Scroll down and click on “IPv6.”
- Toggle the switch to disable IPv6.
○ For Windows:
- Press the Windows key + R to open the Run dialog box.
- Type “control panel” and press Enter to open Control Panel.
- Click on “Network and Internet” and then “Network and Sharing Center.”
- Click on your network connection.
- Click on “Properties” and uncheck the box next to “Internet Protocol Version 6 (TCP/IPv6).”
- Click “OK” to save the changes.
Disabling IPv6 can eliminate potential conflicts and help resolve DHCP lookup failed errors on your device.
- Contact your ISP or network administrator
- When to seek professional help:
○ If you have tried the previous problems and are still experiencing DHCP lookup failed errors, it may be time to contact your Internet Service Provider (ISP) or network administrator
○ Additional assistance can be provided in identifying and correcting the problem.
- Provide important information when contacting animals:
○ When contacting for help, be prepared to provide information such as the specific error messages you see, recent changes to your network settings, and previous problems
○ This information will help the support team better understand the issue and provide appropriate solutions.
-
conclusion
-
A review of 10 simple ways to resolve the DHCP lookup has failed:
- Updating network drivers
- Temporarily disable the VPN and firewall
- DNS cache
- Leave the IP address and create a new one
- Change DNS server settings
- Enable IPv6
- Contact your ISP or network administrator
-
Final Thoughts To encourage users to take action:
- DHCP lookup fail errors can be frustrating, but with these 10 simple steps, you can troubleshoot and fix the problem.
- Remember to review and revise content for clarity, accuracy and conciseness, and to ensure it fits comfortably in a large document.
- Take action to recover network connectivity and resolve DHCP lookup failed errors and follow the steps outlined.